Sunday, August 5, 2012

Shrimp Tacos featuring Blender Salsa


Back when we lived in Marietta, there was a Mexican joint, Laredo's, right down the road. I drove by it every day on the way home from daycare, and we ended up stopping by at least once a week for dinner as it was convenient, delicious, and saved me from having to cook a meal when I was downright exhausted. The thing I loved most about Laredo's was their salsa. It was always fresh, and its heat varied from visit to visit depending on how many jalapenos they decided to throw in that day.

Fresh salsa is always better than jarred and I've always found it really hard to find a salsa that we really like because of the lack of freshness. Personally I like my salsa to be a mix between pico de gallo and your traditional salsa, which generally has a blend of tomatoes, onions, and jalapenos. I came across a recipe for an easy Blender Salsa on Pinterest not too long ago and decided to give it a try so I could have my own restaurant-style salsa. It was really easy to make with the help of my food processor and definitely gave me the fresh salsa taste I had been searching for.

Most Americanized Mexican restaurant dishes are heavy, smothered in cheese, and therefore, very calorie-heavy as well. To make my meal lighter, I decided to go with some simple, yet delicious, shrimp tacos instead. The 'marinade' included the salsa which continued the overall fresh feeling to the whole meal. I punched up the flavor of the accompanying slaw by adding green onion, lime juice, a little olive oil, and fresh cilantro. Finally, to add one more depth of flavor, I charred the corn tortillas over an open flame. It contributed an overall smoky flavor in the end and balanced well with the other fresh flavors of the dish. The next time you are craving some Mexican food, take a step on the lighter side and try these two recipes instead.


Blender Salsa

Ingredients
  • 1- 14 oz can diced tomatoes
  • 1- 10 oz can orginal Rotel
  • 1/2 small onion, roughly chopped
  • 1 clove garlic, peeled and smashed
  • 1 jalapeno, seeded or not (depends on how spicy you like it)
  • 1 teaspoon honey
  • 1/2 teaspoon salt
  • 1/4 teaspoon ground cumin
  • small to medium size handful of cilantro, washed
Put all the ingredients in the base of a food processor or good blender and pulse to combine for 30 seconds or so until all the ingredients are finely chopped and salsa is desired consistency.


Shrimp Tacos

Ingredients
  • 1 pound fresh shrimp (peeled and deveined on both sides)
  • 1/2 package pre-made shredded coleslaw
  • 2 green onions, chopped
  • handful of cilantro, chopped
  • juice of 2 limes, separated
  • 3 Tbsp olive oil, separated
  • 2 Tbsp salsa
  • 6 small corn tortillas
Rinse, peel, and devein shrimp. Make sure to remove both the inside and outside veins. Place shrimp in a bowl along with 1 Tbsp olive oil, juice of one lime, and 2 Tbsp of salsa. Let it sit for about 15 minutes to marinade.

Meanwhile, mix coleslaw mix, green onion, cilantro, 2 Tbsp olive oil, juice of 1 lime, and salt and pepper to taste.

Add shrimp to a slightly warmed skillet and cook with all marinade juices on medium-low until they turn pink, about 5 minutes.

Warm tortillas or char them over a low open flame, a few minutes on each side. Assemble tacos by placing a few shrimp in the middle of the tortilla, then placing a few Tbsp of slaw, and then topping with salsa or hot sauce.


Sunday, July 1, 2012

Israeli Couscous with Roasted Vegetables


Israeli couscous is one of those foods that once you have it, you think, how have I not had this before?!? I was introduced to it last year and have been a fan ever since. Israeli couscous (also known as little pearls) is nothing like the couscous you may be familiar with. It has a chewy, pasta-like texture, and works well in side dishes such as this one.

Isareli couscous with roasted vegetables is versatile because it can be served hot or cold. I've had it both ways and can't decide which is better, so I guess you can make the call depending on what your main entree is. I'll be bringing this as a cold dish to the annual 4th of July Cookout this year and will leave out the feta since it won't be served immediately.

The star of this dish is summer's bountiful supply of garden vegetables. Roasted to perfection you get this smoky, sweet flavor from the vegetables' natural sugars; it can't be beat. The vinaigrette gives off a slight tang from the balsamic vinegar and accents the vegetables perfectly. This recipe is simple, yet delicious, and is a perfect compliment for a late evening summertime meal.


Israeli Couscous with Roasted Vegetables


Ingredients

  • 1 small eggplant, chopped
  • 1 small zucchini, chopped
  • 1 small yellow squash, chopped
  • 1 red pepper, chopped, seeds removed
  • 1 small red onion, chopped
  • 3 cloves garlic
  • 2 Tbsp olive oil
  • Salt and pepper
  • 3 cups water
  • Pinch of salt
  • 1 1/2 cups dry Israeli Couscous
  • 1/4 cup chopped basil
  • 1/3 cup feta cheese

Preheat the oven to 400 degrees F. Place the eggplant, zucchini, yellow squash, red pepper, onion, and garlic on a large baking sheet. Drizzle vegetables with olive oil and gently toss. Season with salt and pepper. Place the pan in the oven and roast for about 30-35 minutes, stirring vegetables occasionally. Remove vegetables from the oven and set aside.

Meanwhile, in a medium saucepan, bring three cups of water to a boil. Add a generous pinch of salt and stir in the Israeli couscous. Reduce heat to a simmer. Simmer until couscous is just tender, with a slight bite, about 10 to 13 minutes. Drain into a fine mesh strainer, rinse with cold water, and set aside.

In a large bowl, combine couscous and roasted vegetables. Stir in the basil and feta cheese.


 Dressing Ingredients
  • 3 Tbsp balsamic vinegar
  • 1 Tbsp Dijon mustard
  • 1 garlic clove, minced
  • 1/2 cup olive oil
  • Salt and freshly ground pepper

In a small bowl, combine the vinegar, mustard, and garlic. Add the oil in a slow steady stream, whisking constantly. Season with salt and pepper to taste. Pour dressing over couscous and vegetables and stir until well combined. Serve at room temperature or chilled.


Adapted from two peas & their pod

Tuesday, June 26, 2012

Chicken Tikka Masala


One of my fondest memories from visiting London in the fall of 2005 involves eating Indian cuisine. We were travelling in a tour group and asked our guide for a recommendation for something different, off the beaten path. His recommendation? His favorite Indian restaurant in all of London. I was a little skeptical (as was my sister who had never had Indian before), but we decided to give it a try. My husband's parents were travelling with us and his mother is a vegetarian, so Indian food, rich with vegetables and savory flavors sounded right up her alley. I had only eaten Indian once before at that point and was unsure what to order. Everything sounded wonderful - smoky tandoori chicken, slow cooked pork on skewers, curried vegetables, and savory chicken masala. There is a reason why this meal was memorable - the flavors were absolutely amazing. In fact, I have spent years trying to replicate those flavors visiting U.S. restaurants and trying out recipes at home (and failing miserably).

I came across this recipe while visiting the What's Cookin, Chicago? blog, in search of frozen meal ideas. The photo looked beautiful and the combination of ingredients listed made me feel that this recipe might be the one! Was it? Oh, yes.

The recipe called for 3-4 boneless skinless chicken breasts weighing a total of 3-4 lbs. I don't know about you, but finding a chicken breast that weighs almost 1 lb seems a little unlikely (and 3-4 lbs was waaaay too much chicken). I recommend purchasing 2 lbs. of chicken but keeping the rest of the recipe measurements the same as this ensures that you get plenty of sauce. I marinated the chicken overnight and I feel that this really brought out a lot more flavor during cooking. This recipe is really a 2 day process, but is worth it because it makes for easier preparation the night you serve this up. Garam Masala, an ingredient I had never used before, really gave the dish a deep, smoky, flavor that you just can't beat. The aromas coming out of my kitchen were unreal while the sauce cooked.

We served up the chicken with basmati rice and homemade naan, thanks to my husband who is a bread making wizard! Because there was so much of it, it lasted for at least three meals, with each one tasting even better than the previous because the flavors kept marrying in the fridge. If you want a little piece of London (er, India) on your table, this recipe fits the bill.


Chicken Tikka Masala

Chicken Tikka Ingredients
  • 1 teaspoon ground cumin
  • 1 teaspoon garlic powder
  • 1/2 teaspoon cayenne pepper
  • 2 teaspoons table salt
  • 4 large boneless, skinless chicken breasts, trimmed of fat
  • 1 cup plain whole-milk yogurt
  • 1 tablespoon vegetable oil
  • 3 medium garlic cloves , minced
  • 1 tablespoon grated fresh ginger

Combine cumin, garlic powder, cayenne, and salt in small bowl. Sprinkle both sides of the chicken with spice mixture, pressing gently so the mixture adheres. Place chicken in a baking dish, cover with plastic wrap, and refrigerate for 30 to 60 minutes.

In large bowl, whisk together yogurt, oil, garlic, and ginger. After the seasoned chicken has spent 30-60 minutes in the fridge, pour the yogurt mixture over the chicken and toss to fully coat both sides. Cover with plastic wrap and refrigerate for 6-8 hours or overnight.


Masala Sauce Ingredients
  • 2 - 3 tablespoons vegetable oil
  • 1 medium onion , diced fine
  • 2 medium garlic cloves , minced
  • 2 teaspoons grated fresh ginger
  • 1 tablespoon tomato paste
  • 1 tablespoon garam masala
  • 1 (28-ounce) can crushed tomatoes
  • 4 teaspoons sugar
  • 1/2 teaspoon table salt
  • 2/3 cup heavy cream
  • 1/4 cup chopped fresh cilantro leaves

Heat the oil in a medium sized saucepan over medium heat until shimmering. Add onion and cook, stirring frequently, until light golden, 8 to 10 minutes. Add garlic, ginger, tomato paste, and garam masala; cook, stirring frequently, until fragrant, about 3 minutes. Add crushed tomatoes, sugar, and salt; bring to boil. Reduce heat to medium-low, cover, and simmer for 15 minutes, stirring occasionally. At this point, allow the sauce to cool. Transfer the sauce into a storage container, cover and then refrigerate overnight.

The next day, remove the chilled sauce from the fridge and heat up in a large dutch oven over medium heat. Stir in cream and return to simmer. Remove pan from heat and cover to keep warm.

While sauce simmers, adjust oven rack to upper-middle position (about 6 inches from heating element) and heat broiler. Remove the chicken from the fridge and place on a parchment lined baking sheet. Place the yogurt coated chicken on the parchment lined baking sheet. Broil chicken until thickest parts register 160 degrees on instant-read thermometer and exterior is lightly charred in spots, 10 to 18 minutes, flipping chicken halfway through cooking.

Let chicken rest 5 minutes, then cut into 1-inch chunks and stir into warm sauce (do not simmer chicken in sauce). Adjust seasoning with salt if needed. Before serving, stir in cilantro into the sauce.


Adapted from What's Cooking, Chicago?

Sunday, June 17, 2012

Samoa Bundt Cake


Samoa Girl Scout cookies are a special treat that comes once a year. That blend of crisp cookie, gooey caramel, toasted coconut and drizzle of chocolate is to die for, and now we won't have to wait any longer to get our 'fix'. Introducing... the Samoa Bundt Cake. This recipe was another Pinterest find and its appearance had perfect timing, a few days shy of my husband's birthday. I know how much he loves Samoa cookies (and sweets in general), so this was perfect to try out. I generally shy away from baking cakes unless we are having company or taking it somewhere; otherwise we have to eat the whole darned thing! It was a birthday cake, though, which means a celebration, and I knew we'd have plenty of family members to help demolish it.

From beginning to end (including clean up time), this cake took a little over 2 hours which isn't too shabby for a made-from-scratch cake. Keep in mind that the frosting needs to chill for one hour, the cake needs to bake for 50-60 minutes, and then it needs to cool completely before you frost it, so it's best to make the frosting first.

To toast the coconut, I used a large skillet on the stove set to medium-high. You must constantly keep an eye on the coconut and stir continuously until it reaches a golden brown. If you take your eye off, pieces will start to burn. How do I know tihs? Let's just say I took a second trip to the grocery store :( Another option is to toast the coconut in a 350 degree oven, keeping a watchful eye on it, and stirring it every few minutes. This seemed a lot of (hot) work to me, hence I went with the stove approach.
Making the frosting is really simple with a hispanic product called Dulce de Leche. Most grocery stores should have this next to the sweetened condensed milk. The brand name I used is La Lechera and its manufactured by Nestle. They make both Dulce de Leche and sweetened condensed milk, so pay close attention to what you grab. If your supermarket doesn't carry it, find your closest Hispanic grocery store as they should have it in stock.

Lots of bowls are used in this recipe due to two different cake batters being made in addition to the frosting, which means I even had to pull out my hand mixer. No worries, if you don't have a stand mixer and a hand mixer, just clean your supplies in between each step.
Combining the two batters to make it marble is kind of fun. First make sure you spray down your bundt pan heavily and dust it with some flour. I forgot the flour step and some of it stuck to the pan, but it was nothing that a little frosting couldn't patch up ;)

Once last tip - after you melt your chocolate, let it cool down a little bit before applying. I didn't do this and some of it slid right off the cake. The cooler it is, the better it will stick.

The overall verdict on this cake was that it was absolutely delicious, tasting very similar to the aforementioned cookie. It is super sweet, and a little goes a long way. I recommend serving it with milk or coffee. The next time you crave a Samoa cookie during the summer, fall, or whenever, this cake will definitely satisfy.


Samoa Bundt Cake

Frosting Ingredients
  • 1 can of Dulce de Leche
  • 1/2 cup confectioners sugar
  • 2 T vanilla extract
  • 2 sticks butter, softened
  • 1/2 tsp salt
  • 1 cup toasted coconut

Beat Dulce de Leche, butter, confectioners sugar, vanilla and salt for 3 minutes. Add in 1 cup toasted coconut. Chill for 1 hour.


Batter #1 Ingredients
  • 1 stick of butter, softened
  • 1 cup of dark brown sugar
  • 2 eggs
  • 3/4 cup All Purpose flour
  • 3/4 tsp baking powder
  • 1/2 tsp baking soda
  • 1/4 tsp salt
  • 1/2 cup whole milk

Preheat the oven to 350 degrees.

Beat butter and sugar on medium high until fluffy. Add in eggs, one at a time, mixing well. Add in milk and mix until well combined. In a separate bowl sift together the remaining dry ingredients. Add dry ingredients to wet ingredients slowly and mix until well combined.


Batter #2 Ingredients
  • 1 cup sugar
  • 3/4 cup + 2 Tbsp All Purpose flour
  • 1/2 cup + 2 Tbsp cocoa powder
  • 3/4 tsp baking powder
  • 1/2 tsp baking soda
  • 1 egg
  • 1/4 cup oil
  • 1/2 tsp salt
  • 1 tsp vanilla
  • 1/2 cup boiling water
  • 1/2 cup milk

Beat oil and sugar on medium high until combined. Add in egg, mixing well. Add in milk and vanilla and mix until well combined. In a separate bowl sift together the remaining dry ingredients. Add dry ingredients to wet ingredients slowly and mix until well combined. Stir in boiling water.

Grease and flour the bundt pan well. Layer the cake, pouring some of the brown sugar batter, then cocoa batter, then brown sugar, until both batter bowls are empty. Tap the bundt pan on the counter a couple of times to remove bubbles. Bake approximately for 1 hour or until a toothpick inserted in the center comes out clean. (mine only took about 50 minutes). Let the cake cool for 15 minutes in the pan and then turn it out onto a cooling rack.


Topping Ingredients
  • 1 1/2 cups toasted coconut
  • 3/4 cup chocolate chips

Once the cake is completely cooled, frost it and then sprinkle with coconut. On the sides and center you may need to gently pat it to stick. Melt the chocolate chips in a microwave safe bowl in 15 second intervals until it is completely melted. Place chocolate in a ziploc bag with a corner cut out about 1/4″ up from the corner. Let it cool a little and then drizzle stripes on the cake.


Adapted from BetsyLife

Sunday, June 3, 2012

Bang Bang Cauliflower


Have you have ever been to Bonefish Grill and had their Bang Bang Shrimp? It's this wonderful appetizer of crispy fried shrimp smothered in a creamy, spicy sauce. It's highly addictive (and, unfortunately, highly fattening as well). The flavors you get, though, are so craveable, and are actually very easy to reproduce in a more healthful way. Let me introduce you to...Bang Bang Cauliflower.

I came across this recipe on Pinterest and was intrigued. For one, cauliflower? It's not my favorite vegetable but it is one that is easy to manipulate and infuse with flavor. Secondly, this recipe is baked, not fried. Unfortunately, a lot of 'oven fried' recipes don't deliver with their promise of crispiness, so I was a little skeptical. What really got me, though, was the sauce. It uses Siracha, my favorite hot sauce, along with lite mayonnaise. That has to make it a little more healthy, right?

I will admit that breaking up a head of cauliflower is not the easiest (nor most tidy) task, and next time I might just buy a bag of pre-cut florets and break those down a little further. The dredging process does take a little bit of time, but the end result is totally worth it.

The cauliflower wasn't super crispy, but the panko helps give the crunch you are looking for. The sauce is SUPER spicy, so I would recommend cutting back on the Siracha to your taste. We topped our cauliflower with freshly cut green onions from our garden (one of the few veggies to make their appearance this spring), and were in love with this dish. Obviously our son couldn't try it because I forgot to set some florets aside before mixing them with the sauce (oops!), but next time I'll remember to do so because I think he'll enjoy the texture/flavor without the sauce. Serve this up alongside an entree such as Broiled Tilapia with Coconut Curry Sauce, and you've got a wonderful Asian-inspired meal for your dinner table.


Bang Bang Cauliflower

Ingredients
  • 2 egg whites
  • 1 head cauliflower
  • 1 cup panko breadcrumbs
  • salt & pepper
  • sliced green onion
  • 1/4 cup lite mayo
  • 1/4 cup Siracha
  • 1 tablespoon rice vinegar
  • 2 tablespoons sugar

Preheat oven to 400 degrees.

Slice your cauliflower florets. Mix salt, pepper, and panko breadcrumbs in a shallow dish. Set  a separate bowl aside with the egg whites.

Dip florets into egg whites, coat with panko mixture, and then place on an ungreased sheet pan. Bake for 20 minutes or until the florets start turning golden brown.

In a small bowl mix all of your sauce ingredients (lite mayo through sugar). Toss the florets with sauce, top with green onion, and serve right away.


Adapted from Around the Table: Loving Food in RI & Beyond......

Tuesday, May 22, 2012

Cornmeal and Rosemary Cake with Balsamic Syrup


When most people think of cake, they usually picture a tall, fluffy, soft, crumbly slice topped with a slather of frosting. Don't get me wrong, I love this 'normal' type of cake - but sometimes I want something a little different. I came across this recipe a couple of years ago while watching Giada on the Food Network and had never gotten around to making it. While sifting through my notebook of recipes (yes, I still have an old school recipe log), I came across this again and decided to go for it.

Rosemary and cornmeal are two ingredients usually not found in cake, but they work really well together here, especially with the balsamic syrup. This cake is dense and has the same texture of cornbread, but it's sweet, savory, and satisfying all at the same time. The syrup is extremely strong, and a little goes a long way so I recommend cutting the recipe for it below by a third unless you will have a use for the remainder of it (which is highly doubtful).

If you're craving something sweet, try this recipe out. I hope it warms your heart (and fills your belly) like it did mine.


Cornmeal and Rosemary Cake with Balsamic Syrup


Ingredients for the Cake
  • 1/2 cup fine yellow cornmeal
  • 1/2 cup cake flour
  • 1 tablespoon minced fresh rosemary leaves
  • 1 teaspoon baking powder
  • 1/4 teaspoon salt
  • 1 stick unsalted butter, softened
  • 1/2 teaspoon vanilla extract
  • 1 1/4 cups powdered sugar, plus more for dusting
  • 4 large egg yolks
  • 2 large eggs
  • 1/2 cup sour cream

Preheat the oven to 350 degrees F. Butter and flour an 8-inch round cake pan.

In a medium bowl, whisk together the cornmeal, cake flour, minced rosemary, baking powder, and salt.

Using a stand mixer with a paddle attachment, on low speed beat the butter and vanilla together until combined. Slowly add the powdered sugar. Once the sugar is incorporated increase the speed to high and beat until fluffy, about 3 minutes. Add the egg yolks and eggs, 1 at a time. Reduce the speed to medium and add the sour cream. On low speed add the dry ingredients just until incorporated.

Pour the batter into the prepared cake pan and smooth the surface with a spatula. Bake in the lower third of the oven until the cake is golden and pulls away from the sides of the pan, about 35 minutes. Transfer the pan to a wire rack and let cool. Transfer the cake from the pan to a serving plate and dust with powdered sugar. Serve with Balsamic Syrup on the side.


Ingredients for the Syrup
  • 1/2 cup sugar
  • 1/2 cup balsamic vinegar
  • 1/2 small sprig fresh rosemary

Place the sugar, balsamic vinegar, and rosemary in a small saucepan. Bring to a boil and simmer until the sugar is dissolved, about 5 minutes. Discard the rosemary sprig and let the syrup cool.


Adapted from Giada de Laurentiis

Wednesday, May 9, 2012

Broiled Tilapia with Thai Coconut Curry Sauce


One of my favorite types of food to eat is Thai, and for good reason. The flavors in Thai cooking are like a party in your mouth, with bits of ginger, lots of spices, and the unmistakeable curry flavor that brings a subtle heat to the back of your throat.

I've tried for years to replicate these wonderful flavors at home but have never had much luck. Fortunately my streak was broken once I came across this recipe. The mixture of curry, coconut milk, fresh vegetables and spices really made this dish outstanding.

The recipe recommended using a food processor instead of chopping the vegetables and spices as a timesaver, but I think this actually helped thicken the sauce as a side effect. I love using my knife (sadistic, maybe so), so I bypassed that suggestion and ended up with more of a broth than a sauce. At first I was disappointed because it didn't come out like I expected, but in the end I was actually glad I prepared it this way. The original recipe was for 6 servings and I only prepared 3 filets, so this made for plenty of leftover sauce to be used later.

I served the tilapia with mashed potatoes, which was great, but for the second go round I prepared jasmine rice made with coconut milk. The coconut milk in the sauce paired with the coconut rice was amazing, and my son kept asking for "more rice, more rice!"  If you love Thai food like I do and are looking for a new way to prepare tilapia, this recipe may be right up your alley.


Broiled Tilapia with Thai Coconut Curry Sauce


Ingredients
  • 1 tsp dark sesame oil, divided
  • 1 tbsp minced peeled fresh ginger
  • 4 garlic cloves, minced
  • 1 cup finely chopped red bell pepper
  • 1 cup chopped scallions
  • 1 tsp curry powder
  • 2 tsp red curry paste
  • 1/2 tsp ground cumin
  • 4 tsp low-sodium soy sauce
  • 1 tbsp brown sugar
  • 2 tsp Asian fish sauce
  • 1 (14-ounce) can light coconut milk
  • 1/4 cup chopped fresh cilantro
  • 6 (6-ounce) tilapia fillets
  • 1/4 tsp salt
  • Cooking spray

Preheat broiler.

Heat 1/2 teaspoon oil in a large nonstick skillet over medium heat. Add ginger and garlic; cook 1 minute. Add pepper and scallions; cook 1 minute. Stir in curry powder, curry paste, and cumin; cook 1 minute. Add soy sauce, sugar, Asian fish sauce, and coconut milk; bring to a simmer (do not boil). Remove from heat and stir in cilantro.

Brush fish with 1/2 teaspoon oil; sprinkle with 1/4 teaspoon salt. Place fish on a baking sheet coated with cooking spray. Broil 7 minutes or until fish flakes easily when tested with a fork. Serve with sauce.


Adapted from Gina's Skinny Recipes

Thursday, April 26, 2012

Mushroom Lasagna


Recently my nephew's nursery was featured on a high-traffic website and I was interested to see how many people had pinned a link to it on Pinterest. Not only did I find that it was very popular (20 pins at least!) but I also came across this wonderful recipe, courtesy of chef Rocco DiSpirito. Can you guess what my nephew's name is? :)

This mushroom lasagna is wonderful for many reasons: first, it uses no-boil noodles. If you've ever made lasagna from scratch you know how much of a pain it can be to have to boil noodles, keeping them from sticking together, laying them out to dry, etc., etc., so this was a bonus. Secondly, I absolutely love mushrooms, so for them to be the star ingredient of this dish won me over immediately. Finally, and also a deal breaker since I tend to shy away from high-fattening recipes, I found that this one was moderate compared to regular lasagna.

My grocery store didn't care whole wheat lasagna noodles so I just used the regular ones they did have. I also found out that cremini mushrooms are the same as baby portabella - who knew? Instead of sticking to the mushroom ratio listed, I just used one package of each (8 ozs) and got more bang for my buck in each bite.

Now I'm sure you're asking, well, does it actually taste good? The answer is yes. It has the gooeyness you love and expect from the cheese, and the meatiness from the mushrooms make you feel like you are having a really hearty dish. I did miss the marinara sauce used in most lasagna recipes and may throw a little bit in next time, but by no means is the lasagna dry without it. The next time you crave something homey or want to have a no-meat main dish, try this one out for size.


Mushroom Lasagna


Ingredients

  • Nonstick cooking spray
  • 2 cups reduced-fat ricotta cheese
  • ½ cup chopped fresh basil
  • 2 tablespoons fresh flat-leaf parsley, chopped
  • 1 cup grated Parmigiano-Reggiano
  • Salt
  • Freshly ground black pepper
  • 4 ounces (about 8 sheets) no-boil whole wheat lasagna noodles
  • 10 ounces sliced cremini mushrooms (baby portabella)
  • 4 ounces white button mushrooms
  • ½ cup shredded reduced-fat mozzarella cheese 

Preheat the oven to 350°F. Coat the inside of an 8 x 8 x 2-inch baking pan with cooking spray and set aside.

In a medium bowl, add the ricotta, basil, parsley, and ¾ cup Parmigiano-Reggiano. Mix with a spoon until blended. Season with salt and pepper to taste. Set aside.

Line the bottom of the prepared baking pan with two lasagna sheets. Top with ½ cup of the cheese mixture. Using the back of a spoon, spread the mixture so that the noodles are covered. Top with a layer of mushrooms. Repeat the procedure two more times. On the last layer, place two lasagna sheets on top of the mushrooms. Spread a layer of the remaining cheese mixture on top. Scatter the mozzarella and remaining Parmigiano-Reggiano on top.

Cover tightly with foil and bake in the oven for 30 minutes.

After the 30 minutes are up, raise the temperature of the oven to 425°F, and bake for another 15 minutes. Uncover the dish and continue to bake for another 15 minutes or until the top is golden brown.


Adapted from Rocco DeSpirito

Thursday, April 19, 2012

Nutella Banana Bread


Nutella is one of those products that I have a love/hate relationship with. I absolutely love the way it tastes but hate that most recipes don't call for a lot of it. What does that problem lead to? I'll tell you what - a half-eaten container of Nutella in my pantry that I end up digging into with a spoon late at night.

Jokes aside, I really do love Nutella. I was first introduced to it a couple of years ago by Giada De Laurentiis on her Everyday Italian show. I remember thinking, how have I not heard about this stuff before? To my delight, when I travelled over to Paris a short time later, each hotel I stayed in offered little packets of Nutella at breakfast, just like your standard jelly, but only bigger!

As I was saying before, most recipes that call for Nutella just don't use enough of it in my opinion. Well this recipe is different. It calls for 3/4 cup of Nutella, giving you that rich, chocolatey, hazelnut flavor along with a little gooeyness in the middle from the added banana. This is definitely my kind of dessert. Yes, this is called Nutella Banana Bread, but in my opinion, it's more like a cake. It's dense like a cake, is definitely as sweet as a cake, and even comes out with a marble swirl, like the pound cake my grandma used to make.

With baking, you have to follow the recipe to a T if you want the result to come out perfectly. Therefore, I didn't touch a thing with this recipe and wouldn't recommend doing so. My bread came out moist and delicious and was best served warm. Pour yourself a nice glass of cold milk and enjoy - I sure did.


Banana Nutella Bread

  • 2 cups all-purpose flour
  • 3/4 tsp. baking soda
  • 1/2 tsp. salt
  • 1/4 cup unsalted butter, at room temperature
  • 1 cup granulated sugar
  • 2 large eggs
  • 1 1/4 cups mashed ripe banana (2 large or 3 small bananas)
  • 1/3 cup skim milk
  • 1 tsp. vanilla extract
  • 3/4 heaping cup Nutella


Preheat oven to 350 degrees. Spray  an 8×4-inch loaf pan with nonstick spray.

In a medium bowl, whisk together flour, baking soda and salt.

In a separate large bowl, beat sugar and butter with an electric mixer at medium speed until blended. Add eggs, one at a time, beating well after each addition. Add banana, milk and vanilla. Beat until blended. Add flour mixture and beat at low speed just until the flour is incorporated (don’t overmix)

Spoon Nutella into a small dish and soften in the microwave for about 15 seconds. Add 1 cup of the banana bread batter to the Nutella and stir until blended well. Spoon Nutella batter alternately with plain banana bread batter into the prepared pan. Swirl batters together with a knife.

Bake 50 to 60 minutes. It will seem a tiny bit undercooked but that’s what you are looking for. Cool for at least 15 minutes in the pan, and then turn out onto a wire rack to cool completely.


Adapted from Six Sisters' Stuff

Wednesday, April 11, 2012

Spinach and Ricotta Ravioli

Sorry I've been neglecting the blog for awhile. Between work and vacation last week I've been quite busy. No fear, though, I've still got plenty of recipes to share with the blogosphere. This post is a special one as it includes a step by step tutorial and is a recipe I came up with all on my own.

When I'm craving comfort food, I usually want something Italian. This might sound crazy coming from a Southern girl of Irish/Czechoslovakian descent, but the combination of tomato sauce and cheese along with a large glass of milk (yes, I know that's weird) really makes me feel all warm and happy inside. Italian food can be incredibly easy to make, so it's a real rarity for me to actually eat out at Italian restaurants. Ravioli are one of my favorite items to eat and make, so I thought it would be perfect to share this recipe with you.

The thought of making pasta from scratch can be rather daunting, so I take a shortcut by using wonton wrappers instead of forming my own ravioli. This may sound strange, but if you think about asian dumplings, they have the same consistency of pasta so they work as a great substitute.

You'll need the following items laid out before you start:
  • A ramekin or small bowl filled with water
  • A pastry brush
  • A cutting board or some other clean surface
  • A cookie sheet lined with wax or parchment paper
  • A teaspoon to scoop the filling onto the ravioli
  • A package of wonton wrappers (found in the produce section, usually next to tofu)
  • The filling itself: 1/2 a small container of ricotta cheese mixed with a package of frozen spinach, thawed and squeezed dry, and a 1/4 cup of parmigiano reggiano
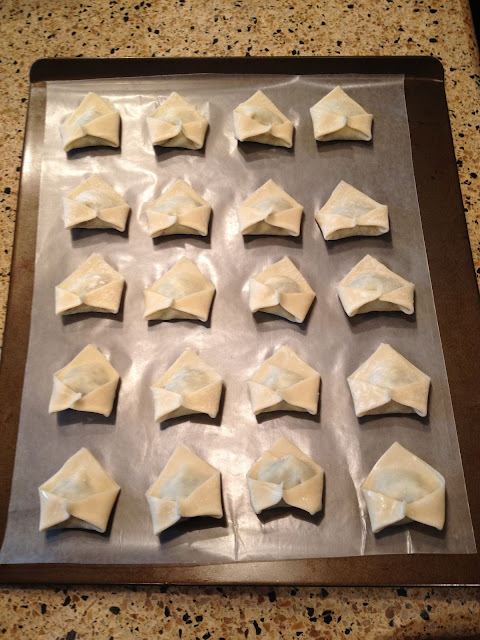
First, lay out one wonton wrapper on the cutting board and place one scoop of filling in the middle. Using the pastry brush, moisten each of the edges with a little bit of water.

Next, fold the wonton wrapper over diagonally, forming a triangle.

Press down, surrounding the filling, to get all of the air pockets out and sealing the edges. Slightly moisten your fingertips and bring the two corners together with a pinch.

Place the ravioli on the parchment paper and finish filling the rest of the ravioli. Once a baking sheet is full, pop it into the freezer for about half an hour for it to harden. This step is really important as it will help keep the ravioli from falling apart once you cook them.

Once the ravioli harden, you can cook them right away in a pot of salted boiling water for 3-4 minutes until they start floating to the top. The ravioli can also be stored in a plastic ziploc bag in the freezer for up to 6 months. Serve with your favorite pasta sauce and top with fresh parmigiano reggiano.

It may seem like a lot of work to make these little treasures, but I guarantee it's worth it. Fresh pasta never tasted so good, especially when you can say you made it yourself.

Sunday, March 18, 2012

Strawberry Sauce


A couple of years ago I bought The Best of Cooking Light and was mesmerized by the Strawberry-Almond Cream Tart on the front cover. On a Sunday afternoon I made this beauty and learned two things: 1. From start to finish this recipe was very time-consuming (albeit delicious) and 2. The strawberry topping, on the other hand, was easy to prepare and could be used in multiple ways. I haven't made this again since (see lesson #1) but this strawberry sauce shows up in my kitchen multiple times a year.

According to Publix' advertisting, strawberries are at their season's peak (as evidenced by their current 3 for $5 deal), so it's a great time to pull out your food processor and make this delectable sauce. Make sure to look for bright red berries as the dark ones aren't as fresh, and the bigger the berry the better as the small ones tend to be a little more tart. I use closer to 1/2 cup of sugar than the 2/3 the recipe calls for as I don't like the sauce to be too coyingly sweet. As I said, the preparation is very easy. The result is this beautiful bright red sauce that is perfect topped onto pancakes, stirred into oatmeal, drizzled on top of ice cream, or spread onto a piece of toast.


Strawberry Sauce

Ingredients
  • 2 cups small fresh strawberries (one package)
  • 2/3 cup sugar
  • 1 tablespoon cornstarch
Place strawberries in food processor; process until pureed. Combine strawberry puree, 2/3 cup sugar, and cornstarch in a small saucepan over medium heat, stirring with a whisk. Bring to a boil, stirring constantly. Reduce heat to low; cook 1 minute. Remove from heat, and cool to room temperature, stirring occasionally.


Adapted from Cooking Light

Monday, March 12, 2012

Chicken with Brussels Sprouts, Rosemary Potatoes and Mustard Sauce


I'll start off by saying I'm not a huge fan of chicken. Yes, it's versatile and can be prepared many ways, but I often find that it dries out too easily, and when it does, I consider it an epic fail. Low and behold, this dish changed my mind about chicken (well at least this time, anyways).

The chicken is cooked first and then rests while the sauce is prepared. Like other meat, and especially with chicken, you want to keep the juices in for as long as you can - if you cut it as soon as it's done, they come spilling out and you end up with, well, a dried piece of meat. I made sure to time everything perfectly so that the potatoes would be ready to come out of the oven at the same time my brussels finished up. Many a time I forget this important step and end up with one of my sides (or even my main, gasp!) ending up cold in the process.

Preparing brussels take a little bit of work but I did this step earlier in the day so I could just throw them in later when needed. First, you must chop off the hard base - a sharp knife makes this easy. Next, peel off some of the tough outer dark green layers with your fingers. Finally, slice them in half lengthwise. Everything else was a snap to put together. I substituted Dijon mustard for whole-grain since I'm not a fan of this tangy variety, and I used packaged apple cider mix instead of purchasing a half gallon of the prepared stuff.

The mustard sauce was delicious as hints of apple came through without overpowering the other flavors. The combination of butter and olive oil to cook the brussels in was really nice. It was just enough to give you that buttery flavor without it seeming too oily. Finishing them off with chicken broth made them tender underneath the partially caramelized exterior. The rosemary potatoes were wonderful. We have more rosemary than we know what to do with in our garden (look for a future post using this wonderful herb!), so this was a great way to incorporate our bounty into a meal. They were crispy on the outside and pillowy-soft in the middle - just what you want from potatoes. Beginning to end this meal only took about half an hour to cook and could definitely make it on your weeknight rotation. Pour yourself up a glass of chardonnay and enjoy!


Chicken with Brussels Sprouts and Mustard Sauce

Ingredients
  • 2 tablespoons olive oil, divided 
  • 4 (6-ounce) skinless, boneless chicken breast halves
  • 3/8 teaspoon salt, divided
  • 1/4 teaspoon freshly ground black pepper
  • 3/4 cup fat-free, lower-sodium chicken broth, divided
  • 1/4 cup unfiltered apple cider
  • 2 tablespoons whole-grain Dijon mustard
  • 2 tablespoons butter, divided
  • 1 tablespoon chopped fresh flat-leaf parsley
  • 12 ounces Brussels sprouts, trimmed and halved 

Preheat oven to 450°. Heat a large ovenproof skillet over high heat. Add 1 tablespoon oil. Sprinkle chicken with 1/4 teaspoon salt and pepper; add to pan. Cook 3 minutes or until browned. Turn chicken; place pan in oven. Bake at 450° for 9 minutes or until done. Remove chicken from pan; keep warm.

Heat pan over medium-high heat. Add 1/2 cup broth and cider; bring to a boil, scraping pan to loosen browned bits. Reduce heat to medium-low; simmer 4 minutes or until thickened. Whisk in mustard, 1 tablespoon butter, and parsley.

Heat remaining 1 tablespoon oil and 1 tablespoon butter in a large nonstick skillet over medium-high heat. Add Brussels sprouts; sauté 2 minutes or until lightly browned. Add remaining 1/8 teaspoon salt and 1/4 cup broth to pan; cover and cook 4 minutes or until crisp-tender. Serve sprouts with chicken and sauce.


Adapted from Cooking Light


Rosemary Potatoes

Ingredients
  • 1 tablespoon olive oil
  • 1 teaspoon chopped fresh thyme
  • 1/2 teaspoon minced fresh rosemary
  • 1/4 teaspoon salt
  • 1/4 teaspoon black pepper
  • 12 ounces quartered red potatoes 

Preheat oven to 450°. Combine olive oil, thyme, rosemary, salt, black pepper, and potatoes in a bowl. Spread potatoes on a jelly-roll pan. Bake at 450° for 25 minutes or until golden brown and tender.


Adapted from Cooking Light 


Wednesday, March 7, 2012

Bananas Foster French Toast


With the normal workweek being so busy, for breakfast I usually opt for something simple and healthy such as cereal, oatmeal, or a bagel. My weekends, however, are pretty laid back and wide open. For breakfast my husband or I usually whip up something a little more complex and sometimes downright decadent. One Saturday night my husband and I were watching the Food Network and a preview for Diners, Drive-ins and Dives came on, giving a sneak peak of Bananas Foster French Toast. We looked at one another and said we MUST make this tomorrow morning. After a quick search on the internet, I came across this recipe. It was simple, I had most of the ingredients on hand, and best of all, it sounded delicious.

I halved the recipe since there were just 2.5 of us and made a couple of substitutions: I used light butter made with olive oil, 2 whole eggs instead of the 3 plus 3 yolks it called for, 1% milk in place of the whole milk/whipping cream combo and used honey wheat bread (it was all we had on hand). This made the french toast feel less heavy. The sauce for this recipe is really what makes the dish. It is velvety and super sweet, and you only need a little bit for each serving as it goes a long way.

The key to making french toast is to dip the bread into and out of the custard quickly. If you linger too long, your french toast will be a sopping mess that never reaches that golden crisp texture you want. You also want to watch your temperature and make sure the pan doesn't get too hot or you'll have crispiness, but of the black-charred nature.  Make sure that your bananas are cut thick and put them in at the last minute so they don't fall apart and become gooey. Save this recipe for a weekend breakfast treat - your family will love it!


Bananas Foster French Toast

Ingredients
  • 4 ounces (1 stick )unsalted butter
  • 1/2 cup (packed) dark brown sugar
  • 2 tablespoons water
  • 4 bananas, peeled and cut diagonally into 1/2-inch-thick slices
  • 3 large whole eggs
  • 3 large egg yolks
  • 1/2 cup whole milk
  • 1/4 cup whipping cream
  • 1 teaspoon vanilla extract
  • 6 slices (3/4-inch thick) brioche or challah bread
  • 3 tablespoons (about) unsalted butter
  • Whipped cream (optional)

Melt the butter in a large stainless-steel skillet with a lid over medium heat. Add the brown sugar and whisk until it melts into the butter. Add the water and whisk until smooth. Cover and set aside while you prepare the French toast.

Whisk the whole eggs and egg yolks in a large bowl to blend. Gradually whisk in the milk, cream and vanilla. Dip the bread slices into the egg mixture, turning to coat and soak until they are completely moistened with the custard.

Heat a heavy, large griddle pan over medium heat. Melt 1 tablespoon of butter on the griddle. Working in batches, transfer the soaked bread to the pan with a slotted spatula and cook until golden brown and cooked through, about 3 minutes per side. Add more butter as needed for each batch.

To serve, add the banana slices to the sauce and cook until the bananas are almost tender, tossing gently, about 3 minutes. Transfer the French toast to plates. Top each with the banana sauce and whipped cream, if desired.

Adapted from Simply Zov Rustic Classics with a Mediterranean Twist

Thursday, March 1, 2012

Rosemary Chicken Salad Sandwich


Anyone who knows me well knows I'm not a huge fan of cold cut sandwiches. Whenever I go to a sandwich shop I usually opt for some type of salad - egg, tuna, or my favorite, chicken. Unfortunately chicken salad is usually made with an abundance of mayonnaise, which overpowers the delicate flavor of the chicken. The same usually goes for recipes I've found so I tend to stay away from making it at home.

We planned to have some friends stop by a few weeks ago and as I was searching for something light to serve for a luncheon, I came across this recipe. It's a less fattening version of the classic favorite with a twist - it includes rosemary and smoked almonds. The combination of light mayo and yogurt gave the salad the creaminess you'd expect but kept it from overshadowing the other flavors involved. I used a purchased rotisserie chicken instead of roasting my own, and decreased the green onions by half as they can tend to be a little strong when the rest of the ingredients in a recipe are rather simple. The result was a satisfyingly zesty chicken salad sandwich with an underlying smoky flavor. My son wanted to eat it straight out of the bowl!


Rosemary Chicken Salad Sandwich

Ingredients
  • 3 cups chopped roasted skinless, boneless chicken breasts (about 3/4 pound)
  • 1/3 cup chopped green onions
  • 1/4 cup chopped smoked almonds
  • 1/4 cup plain fat-free yogurt
  • 1/4 cup light mayonnaise
  • 1 teaspoon chopped fresh rosemary
  • 1 teaspoon Dijon mustard
  • 1/8 teaspoon salt
  • 1/8 teaspoon freshly ground black pepper
  • 10 slices whole-grain bread

Combine first 9 ingredients, stirring well. Spread about 2/3 cup of chicken mixture over each of 5 bread slices, and top with remaining bread slices. Cut sandwiches diagonally in half.

Adapted from Cooking Light

Wednesday, February 22, 2012

Tomato-Basil Soup


On a cold winter's day (back in Georgia moreso than Florida), there's nothing that I crave more than a warm bowl of soup. My favorite indulgence is La Madeleine's Tomato Basil soupe, which comes with an amazing amount of fat and calories - and not in a good way!

You can imagine how happy was I to come across a recipe for this soup in my February edition of Cooking Light that boasts half the fat but promises the same great taste. I admit I was skeptical, but after reading through the ingredient list and seeing that they substitued light cream cheese for heavy cream, I decided to give it a try. This substitution is made in a lot of their recipes, and I've had good results in the past. This time was no different - I got that rich velvety taste the original provides with an extra depth of flavor that comes from the fire roasted tomatoes. This version comes pretty darned close to the real thing if I do say so myself.

My garden is in the process of growing and my basil is just too young to pluck so I ended up using half a tube of basil paste that I had in the fridge. This worked as a great substitute and I would highly recommend it if necessary, even though those tubes can get pretty pricey. I also used my immersion blender since I love it so much, but I'd actually recommend that you do NOT do this for this recipe. My soup came out a little too chunky for my taste and I ended up putting it in my standard blender the next day with much better results.

My parents are coming to visit on Saturday and I'm going to whip up another batch alongside a grilled cheese BLT. I can't imagine a better pairing for the middle of February, even though it will be close to 80 degrees :)


Tomato-Basil Soup

Ingredients
  • 1 tablespoon extra-virgin olive oil
  • 1 1/2 cups prechopped onion
  • 3 garlic cloves, chopped
  • 3/4 cup chopped fresh basil
  • 1 (28-ounce) can fire-roasted diced tomatoes, undrained
  • 1/2 cup (4 ounces) 1/3-less-fat cream cheese, cut into cubes
  • 2 cups 1% low-fat milk
  • 1/4 teaspoon salt
  • 1/4 teaspoon black pepper

Heat olive oil in a saucepan over medium-high heat. Add onion; sauté 3 minutes. Stir in garlic; cook for 1 minute. Add basil and tomatoes; bring to a boil. Stir in cheese until melted.

Place mixture in blender, and blend until smooth. Return to pan; stir in milk, salt, and pepper. Return to medium-high; cook 2 minutes.


Adapted from Cooking Light

Sunday, February 19, 2012

Chocohotopots

I have one requirement for Valentine's Day each year: I MUST eat chocolate. Ok, maybe that's actually every day, but especially for this holiday. I don't even care if my husband is the one to get me chocolate, I just want to eat it. This year I decided I would provide the sweet treat, and let me tell you, I hit this one out of the park.

Chocohotopots are like molten lava cakes, except paired down to ramekin size. They give you that ooey, gooey chocolate texture you crave with a brownie-like type crust on top. This dessert was extremely rich and I would highly recommend pairing it with either vanilla ice cream or a cold glass of milk. 

The ingredient list for chocohotopots is simple and you probably have most of them on hand. I halved the recipe since there were just two of us and it came out perfectly. The next time you are craving an easy chocolate dessert, give this one a whirl - it's a definite winner.


Chocohotopots

Ingredients

  • 1 stick plus 1 tablespoon unsalted butter
  • 4 ounces semisweet chocolate, with 60 percent cocoa solids
  • 2 eggs
  • 3/4 cup superfine sugar
  • 3 tablespoons all-purpose flour
  • Special equipment: 4 (2/3 to 1-cup capacity) ramekins


  • Place a baking sheet in the oven and preheat to 400 degrees F.

    Butter the ramekins with 1 tablespoon butter.

    Either in a microwave or in a bowl suspended over a pan over simmering water, melt the dark chocolate and 1 stick butter, then set aside to cool a little.

    In another bowl, mix the eggs with the sugar and flour with a hand whisk and beat in the cooled butter and chocolate mixture. Divide the mixture between the 4 buttered ramekins.

    Bake for about 20 minutes, by which time the tops will be cooked and cracked and the chocolate gooey underneath. Place each ramekin on a small plate with a teaspoon and serve. Make sure to warn people that these desserts will be HOT!

    Adapted from Nigella Lawson

    Saturday, February 11, 2012

    Tandoori Spiced Chicken Breast


    About a month ago my dear friend Mo (who loves to cook just as much as I do), recommended a recipe he made for Thai Red Curry Mac 'n' Cheese. I immediately wanted to try it out (who doesn't like mac 'n cheese?), and seeing that the recipe came from Aarti Sequeria, I decided to pair it with an Indian-inspired main course. The result? This really great recipe for Tandoori Spiced Chicken Breast. The flavors in this rub totally knocked my socks off! The warmth of the cayenne pepper combined with the smokiness of the cumin gave a flavor profile that I wasn't expecting and I was pleasantly surprised.

    Following some of the reviews I read, I mixed all of the spices together in a storage container and then only used half of it in a separate bowl to make the rub. There was more than enough available, and I rubbed both sides of the breast rather than just one so I could get a nice flavorful crust all around. Because we hadn't bought a grill yet, I used my trusty grill pan on the stove. While the results were just as good, my house definitely got more smokey than I'd like, so I'll be moving outdoors next time. There was too much heat in this dish for my son to join in (I just made a separate non-flavored breast for him), but it was perfect for my husband and I. Surprisingly, leftovers the next day weren't as piquant, but were just as good. Next time I'll follow the full recipe for the pita sandwich so we can enjoy the accompaniments that sound just as fabulous.


    Tandoori Spiced Chicken Breast

    Ingredients:

  • 2 tablespoons onion powder
  • 2 tablespoons garlic powder
  • 2 tablespoons ground ginger
  • 2 tablespoons ground coriander
  • 1 tablespoon ground cumin
  • 1 tablespoon ground cayenne
  • 1 tablespoon ground turmeric
  • 1 tablespoon ground white pepper
  • 1 tablespoon kosher salt
  • 3 (8-ounce) boneless skinless chicken breasts
  • 3 tablespoons vegetable oil


  • Heat grill to medium-high. Combine all spices and the oil in a medium bowl to make a paste. Rub a thin layer of the spice paste onto 1 side of each chicken breast. Grill for 3 to 4 minutes on each side or until slightly charred and just cooked through.

    Adapted from Bobby Flay

    Friday, February 3, 2012

    Spicy Sausage and Mushroom Pizza


    The Super Bowl will be here on Sunday, and I've got a great recipe for you to try out for the occasion. This one comes from Cooking Light, but have no fear - it's full of all the flavor you would expect from a pizza.

    I took a few shortcuts (sometimes you have to on weeknights!) by purchasing a thin crust Boboli shell and by using jarred roasted red peppers instead of dicing up a fresh one. This also saved me time from having to cook it with the other veggies. Any old regular jar of spaghetti sauce should work for this recipe, and I recommend adding more cheese than the recipe says to (I went with 3/4 cup). Lastly, because I have a young son who doesn't tolerate spicy foods yet, I used mild instead of hot turkey sausage. It still had a great punch of flavor with just enough heat to balance out the sweetness of the onions.

    The outcome? An awesome pizza, I must say. My husband and son happily gobbled it up. Does that make it a winner? I'd say so.


    Spicy Sausage and Mushroom Pizza

    Ingredients

    • 1 pound refrigerated fresh pizza dough
    • Cooking spray 
    • 4 ounces hot turkey Italian sausage 
    • 1 cup thinly sliced onion
    • 1 (8-ounce) package presliced mushrooms
    • 1 cup diced red or green bell pepper 
    • 1 tablespoon yellow cornmeal
    • 1/2 cup lower-sodium marinara sauce (such as McCutcheon's)
    • 1/2 cup (2 ounces) shredded part-skim mozzarella cheese 
    • 1/4 cup (1 ounce) grated Parmigiano-Reggiano cheese   

    Preheat oven to 450°. Place dough in a bowl coated with cooking spray; let dough stand, covered, for 15 minutes.

    Heat a large nonstick skillet over medium-high heat; coat pan with cooking spray. Remove casings from sausage. Add sausage to pan; cook 3 minutes, stirring to crumble. Add onion and mushrooms; sauté 4 minutes. Add bell pepper; sauté 2 minutes.

    Sprinkle a baking sheet with cornmeal; roll dough into a 12-inch circle on prepared baking sheet. Spread sauce over dough, leaving a 1/2-inch border. Top with sausage mixture. Sprinkle cheeses over sausage mixture. Bake at 450° on bottom oven rack for 17 minutes or until crust is golden.


    Adapted from Cooking Light

    Wednesday, February 1, 2012

    Broiled Halibut with Ricotta-Pea Puree


    I came across this recipe when I had some leftover ricotta and didn't feel like making anything Italian. We don't eat a lot of red meat in our house and I've been trying to get my husband to eat more fish over the years. With recipes like this, I think I'll succeed in my quest!

    The original recipe called for halibut but my fishmonger didn't have any on hand. Instead, he recommended cod, which has the same density as halibut and has a sweet, delicate flavor without being over-fishy. When it comes to seasoning, I rarely use measuring spoons as some recipes just don't add enough flavor. With this particular recipe, I flavored with enough Paprika to cover both sides of the fish evenly, and I think it really helped in bringing out the fish's natural flavor. Preparation and cleanup were easy by lining my baking sheet with foil and by using my immersion blender instead of a food processor. With such a light fish, I added a nice glass of chardonnay, and I had a winning meal!


    Broiled Halibut with Ricotta-Pea Puree

    Ingredients

  • 3 small carrots, quartered lengthwise
  • 1 medium red onion, thinly sliced
  • 3 tablespoons extra-virgin olive oil
  • Kosher salt and freshly ground pepper
  • 4 6-ounce center-cut skinless halibut fillets (1 3/4 inches thick)
  • 1/2 teaspoon smoked paprika
  • 1 10-ounce package frozen peas
  • 1/3 cup ricotta cheese
  • 1 tablespoon unsalted butter


  • Preheat the broiler. Line a broiler pan with foil and preheat 5 minutes.
    Meanwhile, brush the carrots and onion with 1 tablespoon olive oil and season with salt and pepper. Brush the fish with the remaining 2 tablespoons olive oil, season with salt and pepper and sprinkle with the paprika; brush to coat the fish evenly with paprika.
    Carefully remove the pan from the oven, place the fish in the center and scatter the onion and carrots around. Broil until the fish is golden and just cooked through, 8 to 10 minutes.
    Meanwhile, microwave the peas in a bowl with 1/4 cup water until just tender, about 4 minutes. Transfer the peas and liquid to a food processor and pulse with the ricotta, butter and a pinch of salt to make a slightly chunky puree. Divide the puree among plates and top with the fish, carrots, onion and pan juices.

    Adapted from Food Network Magazine

    Welcome!

    Welcome to Whitesides' Winning Recipes! First off, I'd like to thank my my sister Holly for the idea to start a blog, and my brother-in-law Scott for the great title. They both appreciate good food, and hopefully I deliver for them every once in a while!

    I'll be using this blog to share recipes I've tried out for my family (only ones that are winners of course!), along with helpful cooking tips and suggestions. Thanks for visiting, and I hope I'll inspire you to get in the kitchen and cook some winning recipes!