Thursday, April 26, 2012

Mushroom Lasagna


Recently my nephew's nursery was featured on a high-traffic website and I was interested to see how many people had pinned a link to it on Pinterest. Not only did I find that it was very popular (20 pins at least!) but I also came across this wonderful recipe, courtesy of chef Rocco DiSpirito. Can you guess what my nephew's name is? :)

This mushroom lasagna is wonderful for many reasons: first, it uses no-boil noodles. If you've ever made lasagna from scratch you know how much of a pain it can be to have to boil noodles, keeping them from sticking together, laying them out to dry, etc., etc., so this was a bonus. Secondly, I absolutely love mushrooms, so for them to be the star ingredient of this dish won me over immediately. Finally, and also a deal breaker since I tend to shy away from high-fattening recipes, I found that this one was moderate compared to regular lasagna.

My grocery store didn't care whole wheat lasagna noodles so I just used the regular ones they did have. I also found out that cremini mushrooms are the same as baby portabella - who knew? Instead of sticking to the mushroom ratio listed, I just used one package of each (8 ozs) and got more bang for my buck in each bite.

Now I'm sure you're asking, well, does it actually taste good? The answer is yes. It has the gooeyness you love and expect from the cheese, and the meatiness from the mushrooms make you feel like you are having a really hearty dish. I did miss the marinara sauce used in most lasagna recipes and may throw a little bit in next time, but by no means is the lasagna dry without it. The next time you crave something homey or want to have a no-meat main dish, try this one out for size.


Mushroom Lasagna


Ingredients

  • Nonstick cooking spray
  • 2 cups reduced-fat ricotta cheese
  • ½ cup chopped fresh basil
  • 2 tablespoons fresh flat-leaf parsley, chopped
  • 1 cup grated Parmigiano-Reggiano
  • Salt
  • Freshly ground black pepper
  • 4 ounces (about 8 sheets) no-boil whole wheat lasagna noodles
  • 10 ounces sliced cremini mushrooms (baby portabella)
  • 4 ounces white button mushrooms
  • ½ cup shredded reduced-fat mozzarella cheese 

Preheat the oven to 350°F. Coat the inside of an 8 x 8 x 2-inch baking pan with cooking spray and set aside.

In a medium bowl, add the ricotta, basil, parsley, and ¾ cup Parmigiano-Reggiano. Mix with a spoon until blended. Season with salt and pepper to taste. Set aside.

Line the bottom of the prepared baking pan with two lasagna sheets. Top with ½ cup of the cheese mixture. Using the back of a spoon, spread the mixture so that the noodles are covered. Top with a layer of mushrooms. Repeat the procedure two more times. On the last layer, place two lasagna sheets on top of the mushrooms. Spread a layer of the remaining cheese mixture on top. Scatter the mozzarella and remaining Parmigiano-Reggiano on top.

Cover tightly with foil and bake in the oven for 30 minutes.

After the 30 minutes are up, raise the temperature of the oven to 425°F, and bake for another 15 minutes. Uncover the dish and continue to bake for another 15 minutes or until the top is golden brown.


Adapted from Rocco DeSpirito

Thursday, April 19, 2012

Nutella Banana Bread


Nutella is one of those products that I have a love/hate relationship with. I absolutely love the way it tastes but hate that most recipes don't call for a lot of it. What does that problem lead to? I'll tell you what - a half-eaten container of Nutella in my pantry that I end up digging into with a spoon late at night.

Jokes aside, I really do love Nutella. I was first introduced to it a couple of years ago by Giada De Laurentiis on her Everyday Italian show. I remember thinking, how have I not heard about this stuff before? To my delight, when I travelled over to Paris a short time later, each hotel I stayed in offered little packets of Nutella at breakfast, just like your standard jelly, but only bigger!

As I was saying before, most recipes that call for Nutella just don't use enough of it in my opinion. Well this recipe is different. It calls for 3/4 cup of Nutella, giving you that rich, chocolatey, hazelnut flavor along with a little gooeyness in the middle from the added banana. This is definitely my kind of dessert. Yes, this is called Nutella Banana Bread, but in my opinion, it's more like a cake. It's dense like a cake, is definitely as sweet as a cake, and even comes out with a marble swirl, like the pound cake my grandma used to make.

With baking, you have to follow the recipe to a T if you want the result to come out perfectly. Therefore, I didn't touch a thing with this recipe and wouldn't recommend doing so. My bread came out moist and delicious and was best served warm. Pour yourself a nice glass of cold milk and enjoy - I sure did.


Banana Nutella Bread

  • 2 cups all-purpose flour
  • 3/4 tsp. baking soda
  • 1/2 tsp. salt
  • 1/4 cup unsalted butter, at room temperature
  • 1 cup granulated sugar
  • 2 large eggs
  • 1 1/4 cups mashed ripe banana (2 large or 3 small bananas)
  • 1/3 cup skim milk
  • 1 tsp. vanilla extract
  • 3/4 heaping cup Nutella


Preheat oven to 350 degrees. Spray  an 8×4-inch loaf pan with nonstick spray.

In a medium bowl, whisk together flour, baking soda and salt.

In a separate large bowl, beat sugar and butter with an electric mixer at medium speed until blended. Add eggs, one at a time, beating well after each addition. Add banana, milk and vanilla. Beat until blended. Add flour mixture and beat at low speed just until the flour is incorporated (don’t overmix)

Spoon Nutella into a small dish and soften in the microwave for about 15 seconds. Add 1 cup of the banana bread batter to the Nutella and stir until blended well. Spoon Nutella batter alternately with plain banana bread batter into the prepared pan. Swirl batters together with a knife.

Bake 50 to 60 minutes. It will seem a tiny bit undercooked but that’s what you are looking for. Cool for at least 15 minutes in the pan, and then turn out onto a wire rack to cool completely.


Adapted from Six Sisters' Stuff

Wednesday, April 11, 2012

Spinach and Ricotta Ravioli

Sorry I've been neglecting the blog for awhile. Between work and vacation last week I've been quite busy. No fear, though, I've still got plenty of recipes to share with the blogosphere. This post is a special one as it includes a step by step tutorial and is a recipe I came up with all on my own.

When I'm craving comfort food, I usually want something Italian. This might sound crazy coming from a Southern girl of Irish/Czechoslovakian descent, but the combination of tomato sauce and cheese along with a large glass of milk (yes, I know that's weird) really makes me feel all warm and happy inside. Italian food can be incredibly easy to make, so it's a real rarity for me to actually eat out at Italian restaurants. Ravioli are one of my favorite items to eat and make, so I thought it would be perfect to share this recipe with you.

The thought of making pasta from scratch can be rather daunting, so I take a shortcut by using wonton wrappers instead of forming my own ravioli. This may sound strange, but if you think about asian dumplings, they have the same consistency of pasta so they work as a great substitute.

You'll need the following items laid out before you start:
  • A ramekin or small bowl filled with water
  • A pastry brush
  • A cutting board or some other clean surface
  • A cookie sheet lined with wax or parchment paper
  • A teaspoon to scoop the filling onto the ravioli
  • A package of wonton wrappers (found in the produce section, usually next to tofu)
  • The filling itself: 1/2 a small container of ricotta cheese mixed with a package of frozen spinach, thawed and squeezed dry, and a 1/4 cup of parmigiano reggiano
First, lay out one wonton wrapper on the cutting board and place one scoop of filling in the middle. Using the pastry brush, moisten each of the edges with a little bit of water.

Next, fold the wonton wrapper over diagonally, forming a triangle.

Press down, surrounding the filling, to get all of the air pockets out and sealing the edges. Slightly moisten your fingertips and bring the two corners together with a pinch.

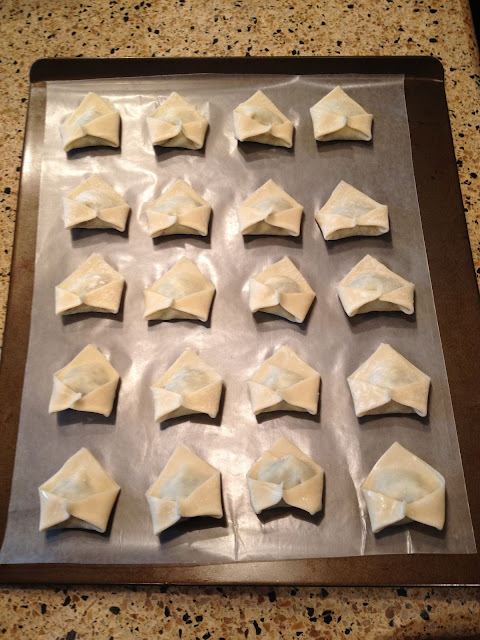
Place the ravioli on the parchment paper and finish filling the rest of the ravioli. Once a baking sheet is full, pop it into the freezer for about half an hour for it to harden. This step is really important as it will help keep the ravioli from falling apart once you cook them.

Once the ravioli harden, you can cook them right away in a pot of salted boiling water for 3-4 minutes until they start floating to the top. The ravioli can also be stored in a plastic ziploc bag in the freezer for up to 6 months. Serve with your favorite pasta sauce and top with fresh parmigiano reggiano.

It may seem like a lot of work to make these little treasures, but I guarantee it's worth it. Fresh pasta never tasted so good, especially when you can say you made it yourself.